Tag Archives: Unix

The FreeBSD-native-ish home lab and network

For many years my setup was pretty simple: A FreeBSD home server running on my old laptop. It runs everything I need to be present on the internet, an email server, a web server (like the one you’ve accessed right now to see this blog post) and a public chat server (XMPP/Jabber) so I can be in touch with friends.

For my home network, I had a basic Access Point and a basic Router.

Lately, my setup has become more… intense. I have IPv6 thanks to Hurricane Electric, the network is passed to my home network (which we’ll talk about in a bit), a home network with multiple VLANs, since friends who come home also need WiFi.

I decided to blog about the details, hoping it would help someone in the future.

I’ll start with the simplest one.

The Home Server

I’ve been running home servers for a long time. I believe that every person/family needs a home server. Forget about buying your kids iPads and Smartphones. Their first devices should be a real computer (sorry Apple, iOS devices are still just a toy) like a desktop/laptop and a home server. The home server doesn’t need to be on the public internet, but mine is, for variety of reasons. This blog being one of them.

I get a static IP address from my ISP, Ucom. After the management change that happened couple of years ago, Ucom has become a very typical ISP (think shitty), but they are the only ones that provide a static IP address, instead of setting it on your router, where you have to do port forwarding.

My home server, hostnamed pingvinashen (meaning the town of the penguins, named after the Armenian cartoon) run FreeBSD. Historically this machine has run Debian, Funtoo, Gentoo and finally FreeBSD.

Hardware wise, here’s what it is:

root@pingvinashen:~ # dmidecode -s system-product-name
Latitude E5470
root@pingvinashen:~ # sysctl hw.model
hw.model: Intel(R) Core(TM) i7-6820HQ CPU @ 2.70GHz
root@pingvinashen:~ # sysctl hw.physmem
hw.physmem: 17016950784
root@pingvinashen:~ # zpool list
NAME    SIZE  ALLOC   FREE  CKPOINT  EXPANDSZ   FRAG    CAP  DEDUP    HEALTH  ALTROOT
zroot   420G   178G   242G        -         -    64%    42%  1.00x    ONLINE  -

While most homelabbers use hardware virtualization, I think that resources are a tight thing, and should be managed properly. Any company that markets itself as “green/eco-friendly” and uses hardware virtualization should do calculations using a pen and paper and prove if going native would save power/resources or not. (sometimes it doesn’t, usually it does)

I use containers, the old-school ones, Jails to be more specific.

I manage jails using Jailer, my own tool, that tries to stay out of your way when working with Jails.

Here are my current jails:

root@pingvinashen:~ # jailer list
NAME        STATE    JID  HOSTNAME              IPv4               GW
antranig    Active   1    antranig.bsd.am       192.168.10.42/24   192.168.10.1
antranigv   Active   2    antranigv.bsd.am      192.168.10.52/24   192.168.10.1
git         Stopped
huginn0     Active   4    huginn0.bsd.am        192.168.10.34/24   192.168.10.1
ifconfig    Active   5    ifconfig.bsd.am       192.168.10.33/24   192.168.10.1
lucy        Active   6    lucy.vartanian.am     192.168.10.37/24   192.168.10.1
mysql       Active   7    mysql.antranigv.am    192.168.10.50/24   192.168.10.1
newsletter  Active   8    newsletter.bsd.am     192.168.10.65/24   192.168.10.1
oragir      Active   9    oragir.am             192.168.10.30/24   192.168.10.1
psql        Active   10   psql.pingvinashen.am  192.168.10.3/24    192.168.10.1
rss         Active   11   rss.bsd.am            192.168.10.5/24    192.168.10.1
sarian      Active   12   sarian.am             192.168.10.53/24   192.168.10.1
syuneci     Active   13   syuneci.am            192.168.10.60/24   192.168.10.1
znc         Active   14   znc.bsd.am            192.168.10.152/24  192.168.10.1

You already get a basic idea of how things are. Each of my blogs (Armenian and English) has its own Jail. Since I’m using WordPress, I need a database, so I have a MySQL jail (which ironically runs MariaDB) inside of it.

I also have a Git server, running gitea, which is down at the moment as I’m doing maintanence. The Git server (and many other services) requires PostgreSQL, hence the existence of  a PostgreSQL jail. I run huginn for automation (RSS to Telegram, RSS to XMPP). My sister has her own blog, using WordPress, so that’s a Jail of its own. Same goes about my fiancée.

Other Jails are Newsletter using Listmonk, Sarian (the Armenian instance of lobste.rs) and a personal ZNC server.

As an avid RSS advocate, I also have a RSS Jail, which runs Miniflux. Many of my friends use this service.

Oragir is an instance of WriteFreely, as I advocate public blogging and ActivityPub. Our community uses that too.

The web server that forwards all this traffic from the public to the Jails is nginx. All it does is proxy_pass as needed. It runs on the host.

Other services that run on the host are DNS (BIND9), an email service running OpenSMTPd (which will be moved to a Jail soon), the chat service running prosody (which will be moved to a Jail soon) and finally, WireGuard, because I love VPNs.

Finally, there’s a IPv6-over-IPv4 tunnel that I use to obtain IPv6 thanks to Hurricane Electric.

Yes, I have a firewall, I use pf(4).

For the techies in the room, here’s what my rc.conf looks like.

# cat /etc/rc.conf
# Defaults
clear_tmp_enable="YES"
syslogd_flags="-ss"
sendmail_enable="NONE"
#local_unbound_enable="YES"
sshd_enable="YES"
moused_enable="YES"
ntpd_enable="YES"
# Set dumpdev to "AUTO" to enable crash dumps, "NO" to disable
dumpdev="AUTO"
zfs_enable="YES"

hostname="pingvinashen.am"

# Networking
defaultrouter="37.157.221.1"
gateway_enable="YES"


ifconfig_em0="up"
vlans_em0="37 1000" # 1000 -> WAN; 37 -> Home Router

ifconfig_em0_1000="inet 37.157.221.130 netmask 255.255.255.0"
ifconfig_em0_37="inet 192.168.255.2 netmask 255.255.255.0"

static_routes="home"
route_home="-net 172.16.100.0/24 -gateway 192.168.255.1"


cloned_interfaces="bridge0 bridge6 bridge10"
ifconfig_bridge10="inet 192.168.10.1 netmask 255.255.255.0"


## IPv6
ipv6_gateway_enable="YES"

gif_interfaces="gif0"
gifconfig_gif0="37.157.221.130 216.66.84.46"
ifconfig_gif0="inet6 2001:470:1f14:ef::2 2001:470:1f14:ef::1 prefixlen 128"
ipv6_defaultrouter="2001:470:1f14:ef::1"

ifconfig_em0_37_ipv6="inet6 2001:470:7914:7065::2 prefixlen 64"
ipv6_static_routes="home guest"
ipv6_route_home="-net 2001:470:7914:6a76::/64 -gateway 2001:470:7914:7065::1"
ipv6_route_guest="-net 2001:470:7914:6969::/64 -gateway 2001:470:7914:7065::1"

ifconfig_bridge6_ipv6="inet6 2001:470:1f15:e4::1 prefixlen 64"

ifconfig_bridge6_aliases="inet6 2001:470:1f15:e4::25 prefixlen 64 \
inet6 2001:470:1f15:e4::80 prefixlen 64      \
inet6 2001:470:1f15:e4::5222 prefixlen 64    \
inet6 2001:470:1f15:e4:c0fe::53 prefixlen 64 \
"


# VPN
wireguard_enable="YES"
wireguard_interfaces="wg0"

# Firewall
pf_enable="YES"

# Jails
jail_enable="YES"
jailer_dir="zfs:zroot/jails"

# DNS
named_enable="YES"

# Mail
smtpd_enable="YES"
smtpd_config="/usr/local/etc/smtpd.conf"

# XMPP
prosody_enable="YES"
turnserver_enable="YES"

# Web
nginx_enable="YES"
tor_enable="YES"

The gif0 interface is a IPv6-over-IPv4 tunnel. I have static routes to my home network, so I don’t go to my server over the ISP every time. This also gives me the ability to get IPv6 in my home network that is routed via my home server.

As you have guessed from this config file, I do have VLANs setup. So let’s get into that.

The Home Network

First of all, here’s a very cheap diagram
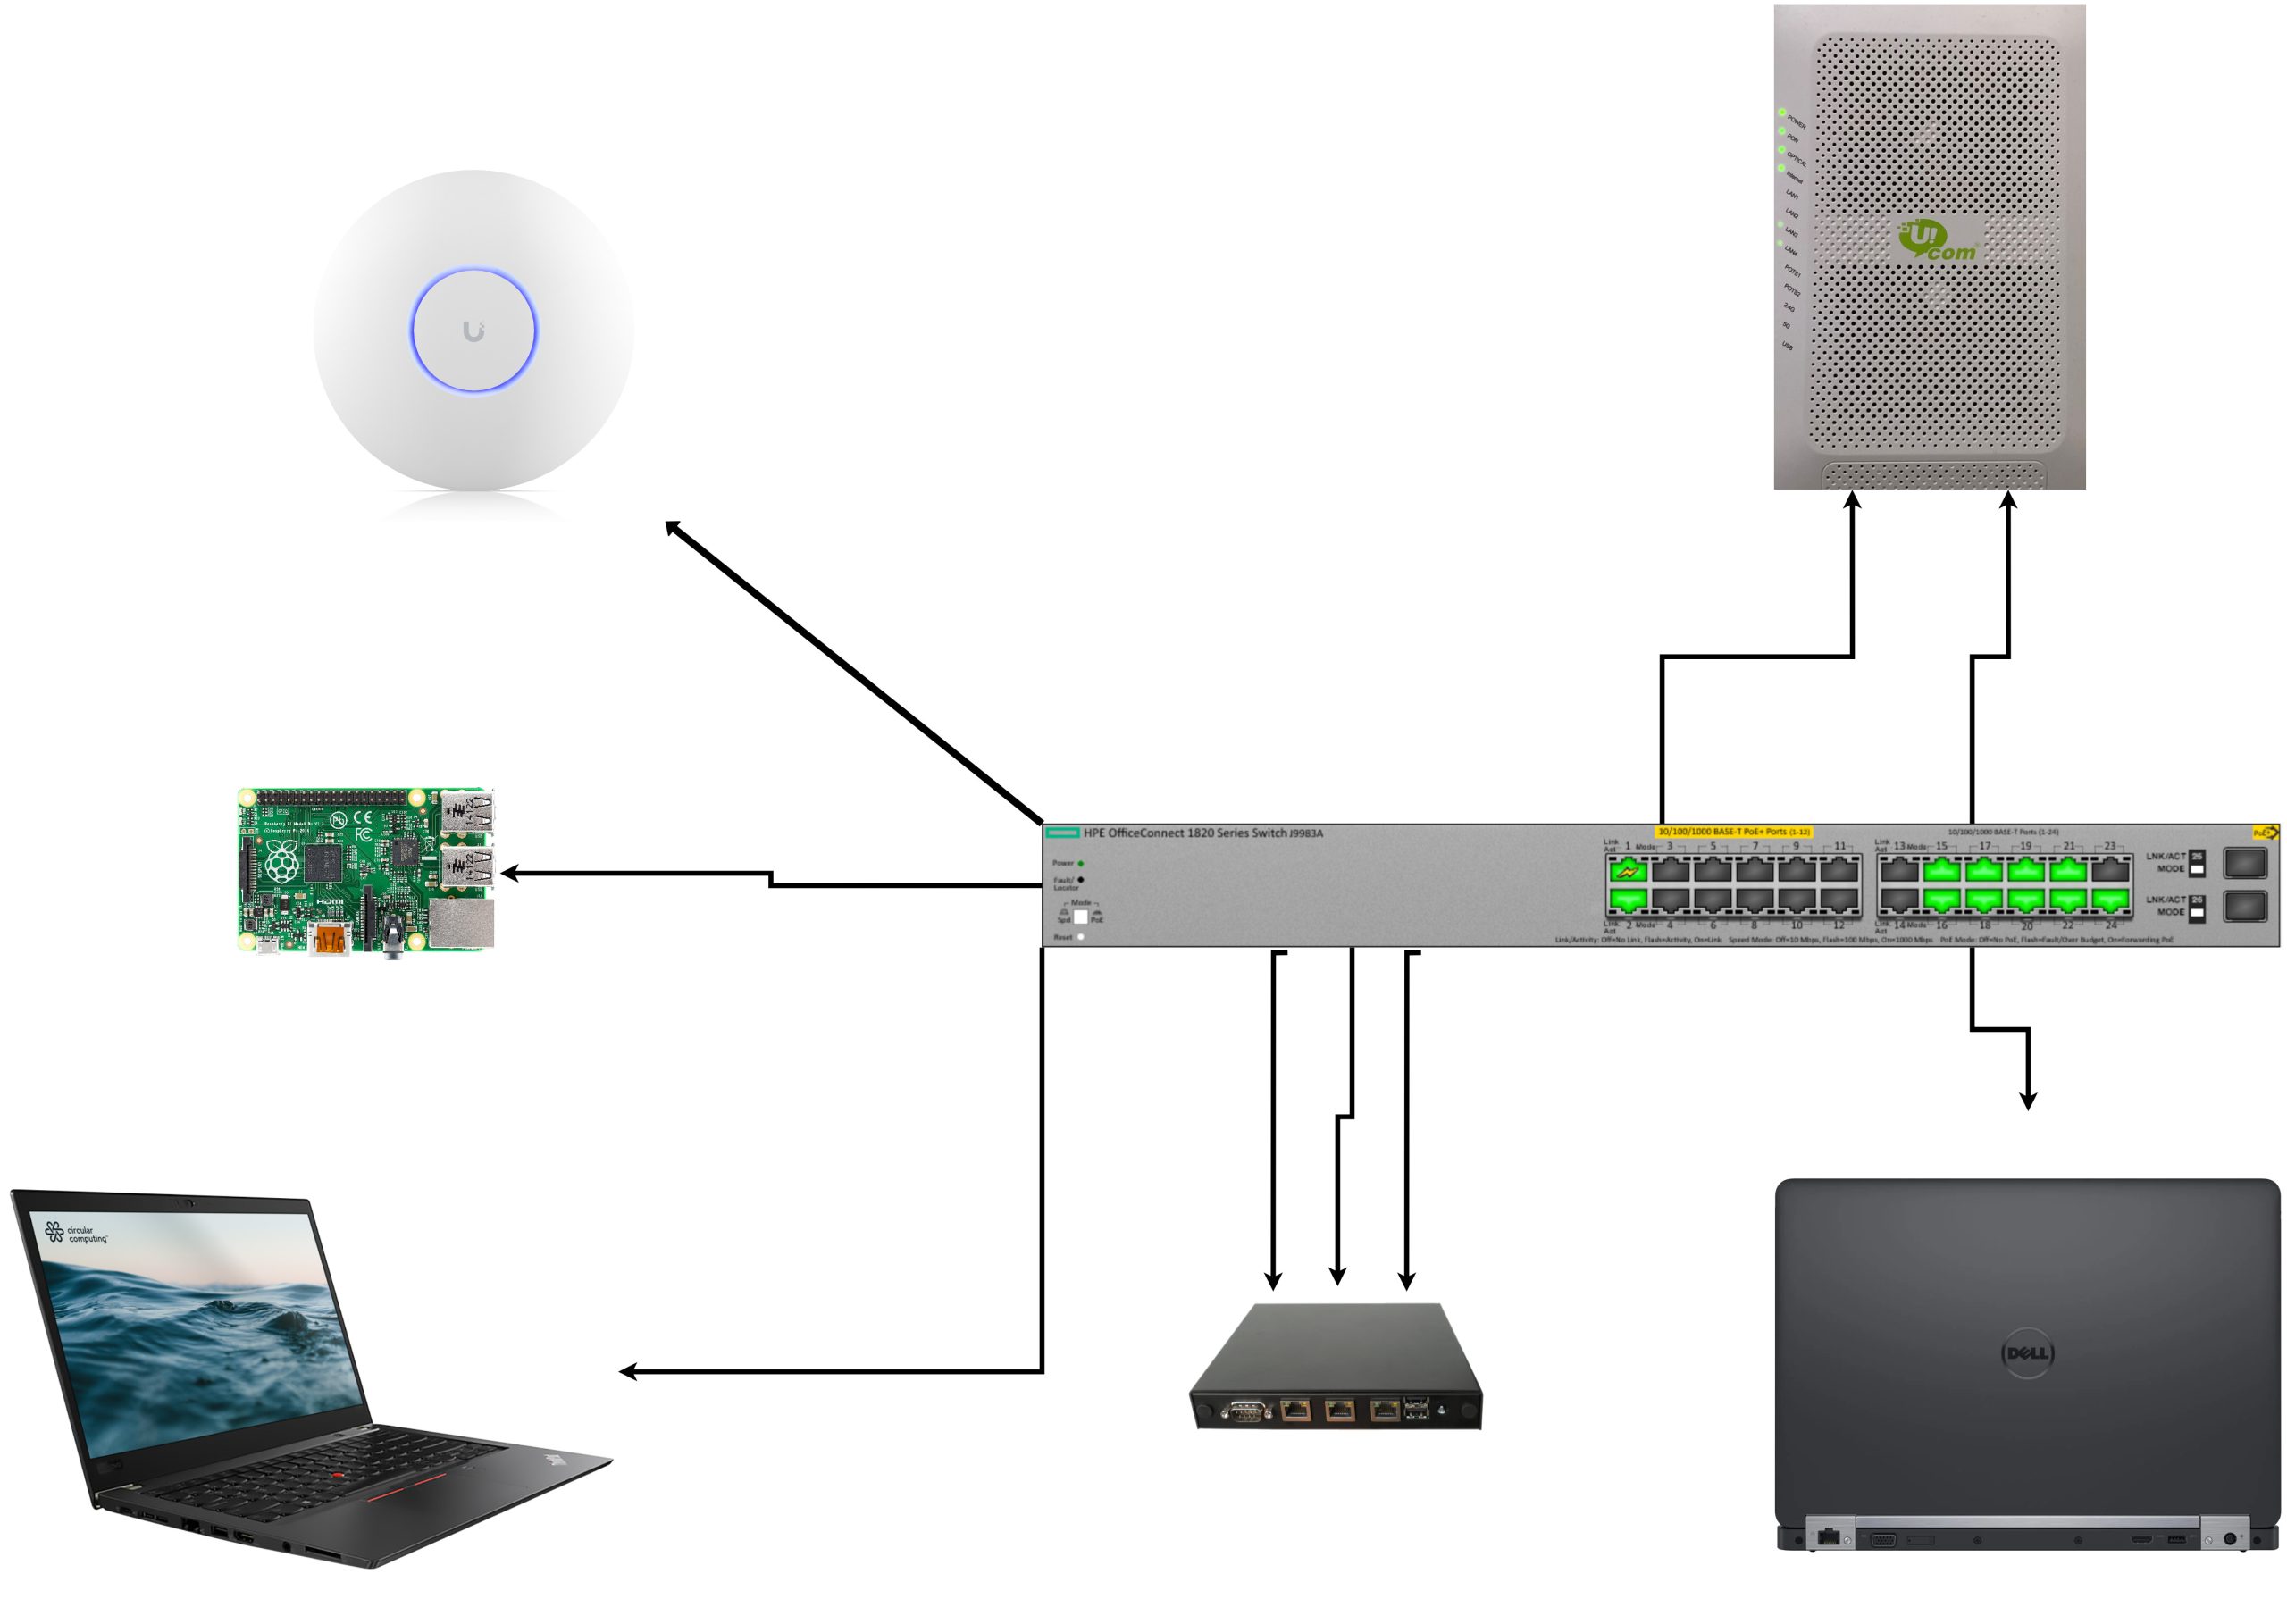
I have the following VLANs setup on the switch.

VLAN ID Purpose
1 Switch Management
1000 pingvinashen (home server) WAN
1001 evn0 (home router) WAN
37 pingvinashen ↔ evn0
42 Internal Management
100 Home LAN
69 Home Guest

Here are the active ports

Port VLANs Purpose
24 untagged: 1 Switch management, connects to Port 2
22 untagged: 1000 pingvinashen WAN, from ISP
21 untagged: 1001 Home WAN, from ISP
20 tagged: 1000, 37 To pingvinashen, port em0
19 untagged: 1001 To home router, port igb1
18 tagged: 42, 100, 69, 99 To home router, port igb2
17 untagged: 37 To home router, port igb0
16 tagged: 42, 100, 69 To Lenovo T480s
15 untagged: 100 To Raspberri Pi 4
2 untagged: 99 From Port 24, for switch management
1 untagged: 42; tagged: 100, 69; PoE To UAP AC Pro

The home router, hostnamed evn0 (named after the IATA code of Yerevan’s Zvartnots International Airport) runs FreeBSD as well, the hardware is the following

root@evn0:~ # dmidecode -s system-product-name
APU2
root@evn0:~ # sysctl hw.model
hw.model: AMD GX-412TC SOC                               
root@evn0:~ # sysctl hw.physmem
hw.physmem: 4234399744
root@evn0:~ # zpool list
NAME    SIZE  ALLOC   FREE  CKPOINT  EXPANDSZ   FRAG    CAP  DEDUP    HEALTH  ALTROOT
zroot  12.5G  9.47G  3.03G        -         -    67%    75%  1.00x    ONLINE  -

The home router does… well, routing. It also does DHCP, DNS, SLAAC, and can act as a syslog server.

Here’s what the rc.conf looks like

clear_tmp_enable="YES"
sendmail_enable="NONE"
syslogd_flags="-a '172.16.100.0/24:*' -H"
zfs_enable="YES"
dumpdev="AUTO"

hostname="evn0.illuriasecurity.com"

pf_enable="YES"
gateway_enable="YES"
ipv6_gateway_enable="YES"

sshd_enable="YES"

# Get an IP address from the ISP's GPON
ifconfig_igb1="DHCP"

# Internal routes with pingvinashen
ifconfig_igb0="inet 192.168.255.1 netmask 255.255.255.0"
ifconfig_igb0_ipv6="inet6 2001:470:7914:7065::1 prefixlen 64"

static_routes="pingvinashen"
route_pingvinashen="-net 37.157.221.130/32 -gateway 192.168.255.2"

ipv6_defaultrouter="2001:470:7914:7065::2"

# Home Mgmt, Switch Mgmt, Home LAN, Home Guest
ifconfig_igb2="up"
vlans_igb2="42 99 100 69"
ifconfig_igb2_42="inet 172.31.42.1 netmask 255.255.255.0"
ifconfig_igb2_99="inet 172.16.99.1 netmask 255.255.255.0"

ifconfig_igb2_100="inet 172.16.100.1 netmask 255.255.255.0"
ifconfig_igb2_100_ipv6="inet6 2001:470:7914:6a76::1 prefixlen 64"

ifconfig_igb2_69="inet 192.168.69.1 netmask 255.255.255.0"
ifconfig_igb2_69_ipv6="inet6 2001:470:7914:6969::1 prefixlen 64"

# DNS and DHCP
named_enable="YES"
dhcpd_enable="YES"

named_flags=""

# NTP
ntpd_enable="YES"

# Router Advertisement and LLDP
rtadvd_enable="YES"
lldpd_enable="YES"
lldpd_flags=""

Here’s pf.conf, because security is important.

ext_if="igb1"
bsd_if="igb0"
int_if="igb2.100"
guest_if="igb2.69"
mgmt_if="igb2.42"
sw_if="igb2.99"

ill_net="172.16.0.0/16"

nat pass on $ext_if from $int_if:network to any -> ($ext_if)
nat pass on $ext_if from $mgmt_if:network to any -> ($ext_if)
nat pass on $ext_if from $guest_if:network to any -> ($ext_if)

set skip on { lo0 }

block in all

pass on $int_if   from $int_if:network   to any
pass on $mgmt_if  from $mgmt_if:network  to any
pass on $sw_if    from $sw_if:network    to any
pass on $guest_if from $guest_if:network to any

block quick on $guest_if from any to { $int_if:network, $mgmt_if:network, $ill_net, $sw_if:network }

pass in on illuria0 from $ill_net to { $ill_net, $mgmt_if:network }

pass inet  proto icmp
pass inet6 proto icmp6
pass out   all   keep state

I’m sure there are places to improve, but it gets the job done and keeps the guest network isolated.

Here’s rtadvd.conf, for my IPv6 folks

igb2.100:\
  :addr="2001:470:7914:6a76::":prefixlen#64:\
  :rdnss="2001:470:7914:6a76::1":\
  :dnssl="evn0.loc.illuriasecurity.com,loc.illuriasecurity.com":

igb2.69:\
  :addr="2001:470:7914:6969::":prefixlen#64:\
  :rdnss="2001:470:7914:6969::1":

For DNS, I’m running BIND, here’s the important parts

listen-on     { 127.0.0.1; 172.16.100.1; 172.16.99.1; 172.31.42.1; 192.168.69.1; };
listen-on-v6  { 2001:470:7914:6a76::1; 2001:470:7914:6969::1; };
allow-query   { 127.0.0.1; 172.16.100.0/24; 172.31.42.0/24; 192.168.69.0/24; 2001:470:7914:6a76::/64; 2001:470:7914:6969::/64;};

And for DHCP, here’s what it looks like

subnet 172.16.100.0 netmask 255.255.255.0 {
        range 172.16.100.100 172.16.100.150;
        option domain-name-servers 172.16.100.1;
        option subnet-mask 255.255.255.0;
        option routers 172.16.100.1;
        option domain-name "evn0.loc.illuriasecurity.com";
        option domain-search "loc.illuriasecurity.com evn0.loc.illuriasecurity.com";
}

host zvartnots {
    hardware ethernet d4:57:63:f1:5a:36;
    fixed-address 172.16.100.7;
}

host unifi0 {
    hardware ethernet 58:9c:fc:93:d1:0b;
    fixed-address 172.31.42.42;
}
[…] subnet 172.31.42.0 netmask 255.255.255.0 { range 172.31.42.100 172.31.42.150; option domain-name-servers 172.31.42.1; option subnet-mask 255.255.255.0; option routers 172.31.42.1; } subnet 192.168.69.0 netmask 255.255.255.0 { range 192.168.69.100 192.168.69.150; option domain-name-servers 192.168.69.1; option subnet-mask 255.255.255.0; option routers 192.168.69.1; }

So you’re wondering, what’s this unifi0? Well, that brings us to

T480s

This laptop has been gifted to me by [REDACTED] for my contributions to the Armenian government (which means when a server goes down and no one knows how to fix it, they called me and I showed up)

Here’s the hardware

root@t480s:~ # dmidecode -s system-version
ThinkPad T480s
root@t480s:~ # sysctl hw.model
hw.model: Intel(R) Core(TM) i5-8350U CPU @ 1.70GHz
root@t480s:~ # sysctl hw.physmem
hw.physmem: 25602347008
root@t480s:~ # zpool list
NAME    SIZE  ALLOC   FREE  CKPOINT  EXPANDSZ   FRAG    CAP  DEDUP    HEALTH  ALTROOT
zroot   224G   109G   115G        -         -    44%    48%  1.00x    ONLINE  -

The T480s has access to VLAN 100, 42, 69, but the host itself has access only to VLAN 100 (LAN), while the jails can exist on other VLANs.

So I have a Jail named unifi0 that runs the Unifi Management thingie.

Here’s what rc.conf of the host looks like

clear_tmp_enable="YES"
syslogd_flags="-ss"
sendmail_enable="NONE"
sshd_enable="YES"
ntpd_enable="YES"
# Set dumpdev to "AUTO" to enable crash dumps, "NO" to disable
dumpdev="AUTO"
zfs_enable="YES"

hostname="t480s.evn0.loc.illuriasecurity.com"

ifconfig_em0="up -rxcsum -txcsum"
vlans_em0="100 42 69"
ifconfig_em0_100="up"
ifconfig_em0_42="up"
ifconfig_em0_69="up"

cloned_interfaces="bridge0 bridge100 bridge42 bridge69"

create_args_bridge100="ether 8c:16:45:82:b4:10"
ifconfig_bridge100="addm em0.100 SYNCDHCP"
ifconfig_bridge100_ipv6="inet6 auto_linklocal"
rtsold_flags="-i -F -m bridge100"
rtsold_enable="YES"

create_args_bridge42=" ether 8c:16:45:82:b4:42"
create_args_bridge69=" ether 8c:16:45:82:b4:69"

ifconfig_bridge42="addm em0.42"
ifconfig_bridge69="addm em0.69"


jail_enable="YES"
jailer_dir="zfs:zroot/jailer"

ifconfig_bridge0="inet 10.1.0.1/24 up"
ngbuddy_enable="YES"
ngbuddy_private_if="nghost0"
dhcpd_enable="YES"

lldpd_enable="YES"

I used Jailer to create the unifi0 jail, here’s what the jail.conf looks like

# vim: set syntax=sh:
exec.clean;
allow.raw_sockets;
mount.devfs;

unifi0 {
  $id             = "6";
  devfs_ruleset   = 10;
  $bridge         = "bridge42";
  $domain         = "evn0.loc.illuriasecurity.com";
  vnet;
  vnet.interface = "epair${id}b";

  exec.prestart   = "ifconfig epair${id} create up";
  exec.prestart  += "ifconfig epair${id}a up descr vnet-${name}";
  exec.prestart  += "ifconfig ${bridge} addm epair${id}a up";

  exec.start      = "/sbin/ifconfig lo0 127.0.0.1 up";
  exec.start     += "/bin/sh /etc/rc";

  exec.stop       = "/bin/sh /etc/rc.shutdown jail";
  exec.poststop   = "ifconfig ${bridge} deletem epair${id}a";
  exec.poststop  += "ifconfig epair${id}a destroy";

  host.hostname   = "${name}.${domain}";
  path            = "/usr/local/jailer/unifi0";
  exec.consolelog = "/var/log/jail/${name}.log";
  persist;
  mount.fdescfs;
  mount.procfs;
}

Here are the important parts inside the jail

root@t480s:~ # cat /usr/local/jailer/unifi0/etc/rc.conf
ifconfig_epair6b="SYNCDHCP"
sendmail_enable="NONE"
syslogd_flags="-ss"
mongod_enable="YES"
unifi_enable="YES"
root@t480s:~ # cat /usr/local/jailer/unifi0/etc/start_if.epair6b 
ifconfig epair6b ether 58:9c:fc:93:d1:0b

Don’t you love it that you can see what’s inside the jail from the host? God I love FreeBSD!

Did I miss anything? I hope not.

Oh, for the homelabbers out there, the T480s is the one that runs things like Jellyfin if needed.

Finally, the tiny 

Raspberry Pi 4, Model B

I found this in a closed, so I decided to run it for TimeMachine.

I guess all you care about is rc.conf

hostname="tm0.evn0.loc.illuriasecurity.com"
ifconfig_DEFAULT="DHCP inet6 accept_rtadv"
sshd_enable="YES"
sendmail_enable="NONE"
sendmail_submit_enable="NO"
sendmail_outbound_enable="NO"
sendmail_msp_queue_enable="NO"
growfs_enable="YES"
powerd_enable="YES"
# Set dumpdev to "AUTO" to enable crash dumps, "NO" to disable
dumpdev="AUTO"
zfs_enable="YES"
rtsold_enable="YES"
samba_server_enable="YES"

And the Samba Configuration

[global]
# Network settings
workgroup = WORKGROUP
server string = Samba Server %v
netbios name = RPi4

# Logging
log file = /var/log/samba4/log.%m
max log size = 50
log level = 0

# Authentication
security = user
encrypt passwords = yes
passdb backend = tdbsam
map to guest = Bad User

min protocol = SMB2
max protocol = SMB3


# Apple Time Machine settings
vfs objects = catia fruit streams_xattr
fruit:metadata = stream
fruit:resource = stream
fruit:encoding = native
fruit:locking = none
fruit:time machine = yes

# File System support
ea support = yes
kernel oplocks = no
kernel share modes = no
posix locking = no
mangled names = no
smbd max xattr size = 2097152

# Performance tuning
read raw = yes
write raw = yes
getwd cache = yes
strict locking = no

# Miscellaneous
local master = no
preferred master = no
domain master = no
wins support = no

[tm]
comment = Time Machine RPi4
path = /usr/local/timemachine/%U
browseable = yes
read only = no
valid users = antranigv
vfs objects = catia fruit streams_xattr
fruit:time machine = yes
fruit:advertise_fullsync = true
fruit:time machine max size = 800G  # Adjust the size according to your needs
create mask = 0600
directory mask = 0700

That’s pretty much it.

Conclusion

I love running homebrew servers, home networks and home labs. I love that (almost) everything is FreeBSD. The switch itself runs Linux, and the Unifi Access Point also runs Linux, both of which I’m pretty happy with.

While most homelabbers used ESXi in the past, I’m happy to see that most people are moving to open source solutions like Proxmox and Xen, but I think that FreeBSD Jails and bhyve is much better. I still don’t have a need for bhyve at the moment, but I would use it if I needed hardware virtualization.

Most homelabbers would consider the lack of Web/GUI interfaces as a con, but I think that it’s a pro. If I need to “replicate” this network, all I need to do is to copy some text files and modify some IP addresses / Interface names.

I hope this was informative and that it would be useful for anyone in the future.

That’s all folks… 

Reply via email.

Antranig Vartanian

June 5, 2024

I’m having a hard time understanding how these BootCamps work. Their whole value is teaching people how to code, sometimes they also teach programming, but not always. As far as I can tell, they never teach how to use a computer, which is weird.

Take car mechanics as an example, I assume they know how to use a car and the basics of how it works before they start fixing things. But the same doesn’t seem to be true about coding/programming.

I met with a couple of students today who were going to a BootCamp to learn coding-y, DevOps-y and Security things, but they were not able to define what an OS process is. They also had a hard time interacting with a computer.

How did we get here? No, this is not a rhetorical question, I really want to know.

I’m not saying that everyone should know everything about every operating system, but during your work, where you get paid, you will need to use tools such as grep, AWK, xargs, etc.

I remember, once, years ago, I was supposed to teach “security” to a group of students, but I realized it would be more helpful if I teach them Unix and computer networking, so we ended up doing that.

Months after their graduation, I saw one of the students, and he asked me “hey, can we do these Unix classes again? Looks like they were important”.

I ended up mentoring him, and now he does mostly Taco Bell programming and he gets things done.

My feeling is that we need a book for everyone that’s named “learn this before learning how to program” and we teach basic things such as process management, service management, the Unix shell, how a computer network works, etc.

But alas, I barely have time to blog, however I feel that this computer book would be a best seller everywhere.

Back to work, cheers.

Reply via email.

Mirroring OmniOS: The Complete Guide; Part One

Chapter Ⅰ

I know that “Complete Guide” and “Part One” are oxymorons, but hey, be happy that I’m publishing in parts, otherwise I’d completely ignore this blog post.

Two weeks ago I decided to play with illumos again. I was speaking with a friend and we were sharing our frustrations regarding Open-Source contribution. We write the code, we submit, we get feedback, we submit again, and then we’re ghosted. It’s like the LinkedIn or Tinder version of Software Engineering.

Then I asked him about his best open-source experience and he told me “illumos of course!”.

I was amazed. I thought you had to be very technical in order to even build illumos, but turns out they have an amazing documentation on building illumos and OmniOS (an illumos distribution) has done work to make sure that the system can be self-hosted (i.e. The OS can build itself).

So, I decided to fire up OmniOS on our hackerspace server running FreeBSD inside a bhyve VM.

The installation went smoothly, but the IPS packages were slow to download, and I might be wrong (please correct me if I am) but IPS doesn’t seem to be keeping a local copy of the files. It always downloads. Is that configurable?

Regardless. I thought that the best way to contribute is to advocate. In order to do that I needed to make sure that IPS servers are fast in Armenia. Hence the mirroring project started.

Obey!

Requirements

Here are some terminology that I will use in this blog post, just so we are on the same page.

  • OmniOS: an illumos distribution
  • Origin: OmniOS’s IPS servers at pkg.omnios.org
  • Local: A copy of the Origin
  • Repository: A collection of software
  • Core: The Core Repository of OmniOS
  • Extras: The Extra Repository of OmniOS
  • IPS or PKG: The Image Packaging System and its utility, pkg
  • Zone: an illumos Zone (similar to FreeBSD Jails, Linux Containers, chroot) running on OmniOS

Now that we are on the same page, let’s talk about our setup and what we need.

  • An internet connection: duh!
  • A domain name: I decided to use pkg.omnios.illumos.am. Yes, I’m lucky like that.
  • A publicly accessible IP address.
  • A server: I am running OmniOS Stable (r151048) inside a VM. You can use bare-metal or a cloud VM if you want.
  • Storage: I am currently using around 50GB of storage, expect that to go around 300GB when we get to Part Three

Pre-Mirroring Setup

Before we setup our mirror, let’s make sure that we have a good infrastructure that we can maintain.

Here’s what we’ll create

  • A Zone that will act as the HTTP(s) server using nginx at IP address 10.10.0.80
  • A Zone that will do the mirroring using IPS tools at 10.10.0.51
  • An virtual dumb switch (etherstub) that will connect the Zones and the Global-Zone (a.k.a The Host) together. The GZ will have an address of 10.10.0.1
  • ZFS datasets for each Core and Extras Repository (for each release)

Please note that there are many ways to do this, for example, having everything in a Global Zone, running IPS mirroring and nginx in a single Zone, not using etherstub at all, etc. But I like this setup as it will allow us to “grow” in the future.

From now on, omnios# means that we’re in the Global Zone and zone0# means we’re inside a Zone named zone0.

Let’s start with setting up our etherstub and connecting our Global Zone to it

omnios# dladm create-etherstub switch0
omnios# dladm create-vnic -l switch0 vnic0
omnios# ipadm create-if vnic0
omnios# ipadm create-addr -T static -a 10.10.0.1/24 vnic0/switch0

Done!

Now, we will setup our Zones using the zadm utility. Install zadm by running

omnios# pkg install zadm

After installing zadm, we’ll create a dataset for our Zones

omnios# zfs create -o mountpoint=/zones rpool/zones

This assumes that your ZFS pool is named rpool.

Finally, we can create our Zones. Running

omnios# zadm create -b pkgsrc www0

will open your $EDITOR, where you need to modify some JSON, here’s what mine looks like!

{
   "autoboot" : "true",
   "brand" : "pkgsrc",
   "ip-type" : "exclusive",
"dns-domain" : "omnios.illumos.am", "net" : [ { "allowed-address" : "10.10.0.80/24", "defrouter" : "10.10.0.1", "global-nic" : "switch0", "physical" : "www0" } ], "pool" : "", "scheduling-class" : "", "zonename" : "www0", "zonepath" : "/zones/www0" }

After saving the file, zadm will install the Zone.

Now let’s setup our mirroring Zone. Do the same but change the Zone name to repo, the brand to lipkg (and -b lipkg) and set the IP address to 10.10.0.51/24.

All we need now is to forward the HTTP/HTTPS traffic to www0 Zone and allow all Zones to access the internet using NAT.

Create and edit the IPFilter’s NAT file at /etc/ipf/ipnat.conf, here’s an example configuration

map vioif0 10.10.0.0/24 -> 212.34.250.10

rdr vioif0 212.34.250.10/32 port 80 -> 10.10.0.80 port 80 tcp
rdr vioif0 212.34.250.10/32 port 443 -> 10.10.0.80 port 443 tcp

Make sure you set the correct interface name and the correct external IP address.

Finally, we can boot our Zones!

omnios# zadm boot www0
omnios# zadm boot repo

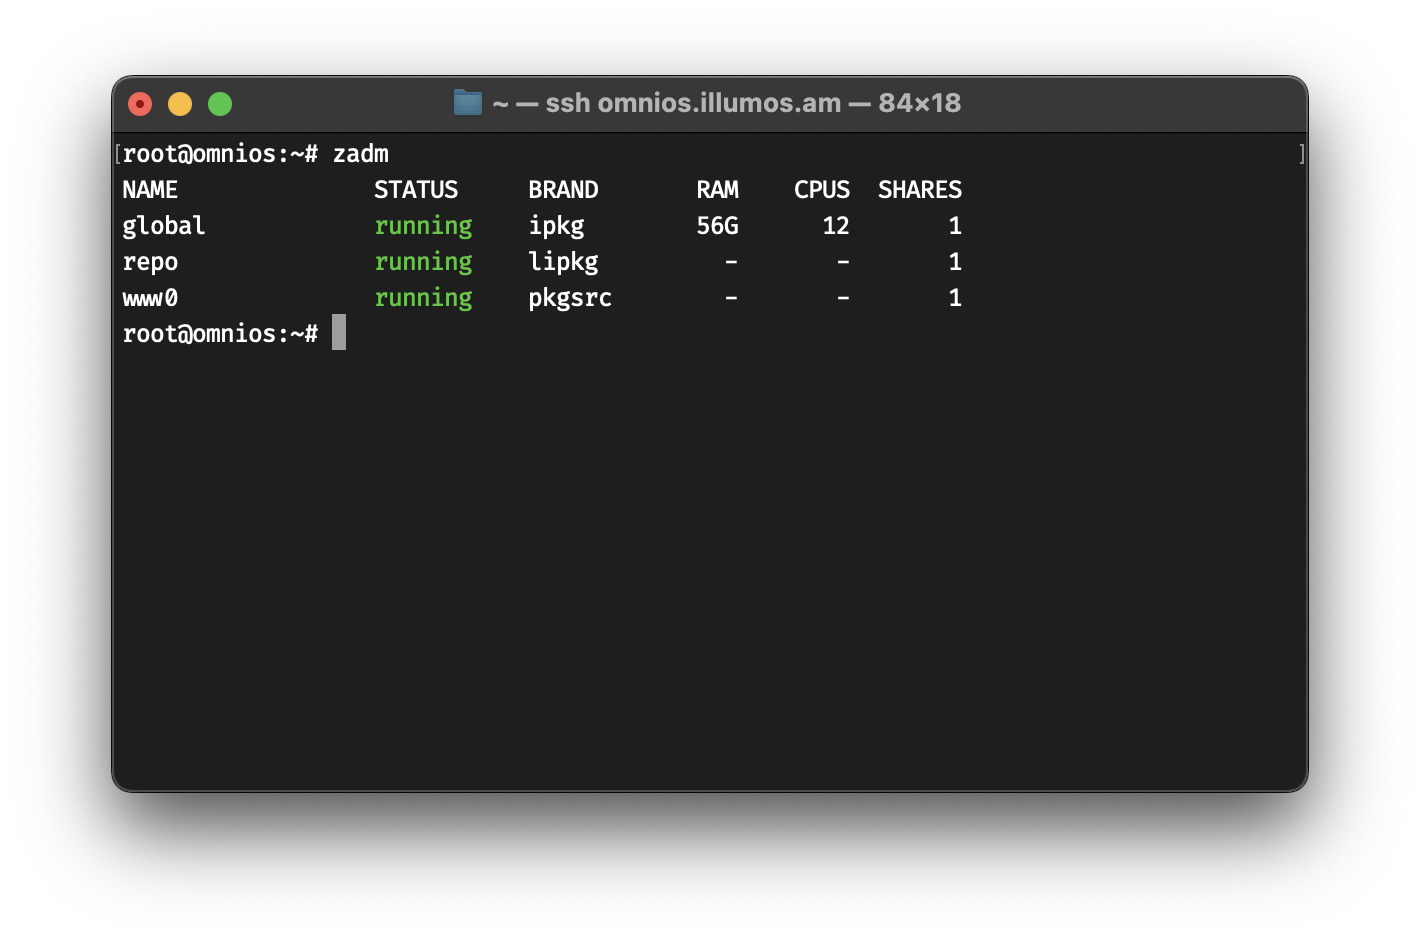
You should see the following output when you run zadm again

omnios# zadm
NAME              STATUS     BRAND       RAM    CPUS  SHARES
global            running    ipkg        56G      12       1
repo              running    lipkg         -       -       1
www0              running    pkgsrc        -       -       1

Great! Let’s setup the mirroring process.

Mirroring Setup

Let’s create a ZFS dataset for repos for each release

repo# zfs create -o mountpoint=/repo rpool/zones/repo/ROOT/repo      
repo# zfs create rpool/zones/repo/ROOT/repo/r151048      
repo# zfs create rpool/zones/repo/ROOT/repo/r151048/core 
repo# zfs create rpool/zones/repo/ROOT/repo/r151048/extra

And then we use the pkgrepo command to create a repository

repo# pkgrepo create /repo/r151048/core
repo# pkgrepo create /repo/r151048/extra

And finally, we can start receiving the packages from Origin to Local

repo# pkgrecv -s https://pkg.omnios.org/r151048/core/  -d /repo/r151048/core  '*'
repo# pkgrecv -s https://pkg.omnios.org/r151048/extra/ -d /repo/r151048/extra '*'

This will take a while depending on your internet connection speed and the load on OmniOS’s Origin. It’s like a good investment, we spend load and time now so we save traffic and time later 🙂

After it’s done, we need to set the publisher of these repos the same as Origin.

repo# pkgrepo set -s /repo/r151048/core   publisher/prefix=omnios
repo# pkgrepo set -s /repo/r151048/extra/ publisher/prefix=extra.omnios

And we’re done!

Now need to serve these repos using IPS’s depot server.

We will create two instances of the depotd server, one for core and one for extra.

  • r151048/core will run on 5148
  • r151048/extra will run on 1148
  • (in the future) r151050/core will run on 5150
  • (in the future) r151050/extra will run on 1150

We start with core

repo# svccfg -s pkg/server add r151048_core
repo# svccfg -s pkg/server:r151048_core addpg pkg application
repo# svccfg -s pkg/server:r151048_core setprop pkg/inst_root = /repo/r151048/core/
repo# svccfg -s pkg/server:r151048_core setprop pkg/port = 5148
repo# svccfg -s pkg/server:r151048_core setprop pkg/proxy_base = https://pkg.omnios.illumos.am/r151048/core

And we do the same for extra

repo# svccfg -s pkg/server add r151048_extra
repo# svccfg -s pkg/server:r151048_extra addpg pkg application
repo# svccfg -s pkg/server:r151048_extra setprop pkg/inst_root = /repo/r151048/extra/
repo# svccfg -s pkg/server:r151048_extra setprop pkg/port = 1148
repo# svccfg -s pkg/server:r151048_extra setprop pkg/proxy_base = https://pkg.omnios.illumos.am/r151048/extra

Finally, we enable the services

repo# svcadm enable  pkg/server:r151048_core pkg/server:r151048_extra
repo# svcadm restart pkg/server:r151048_core pkg/server:r151048_extra

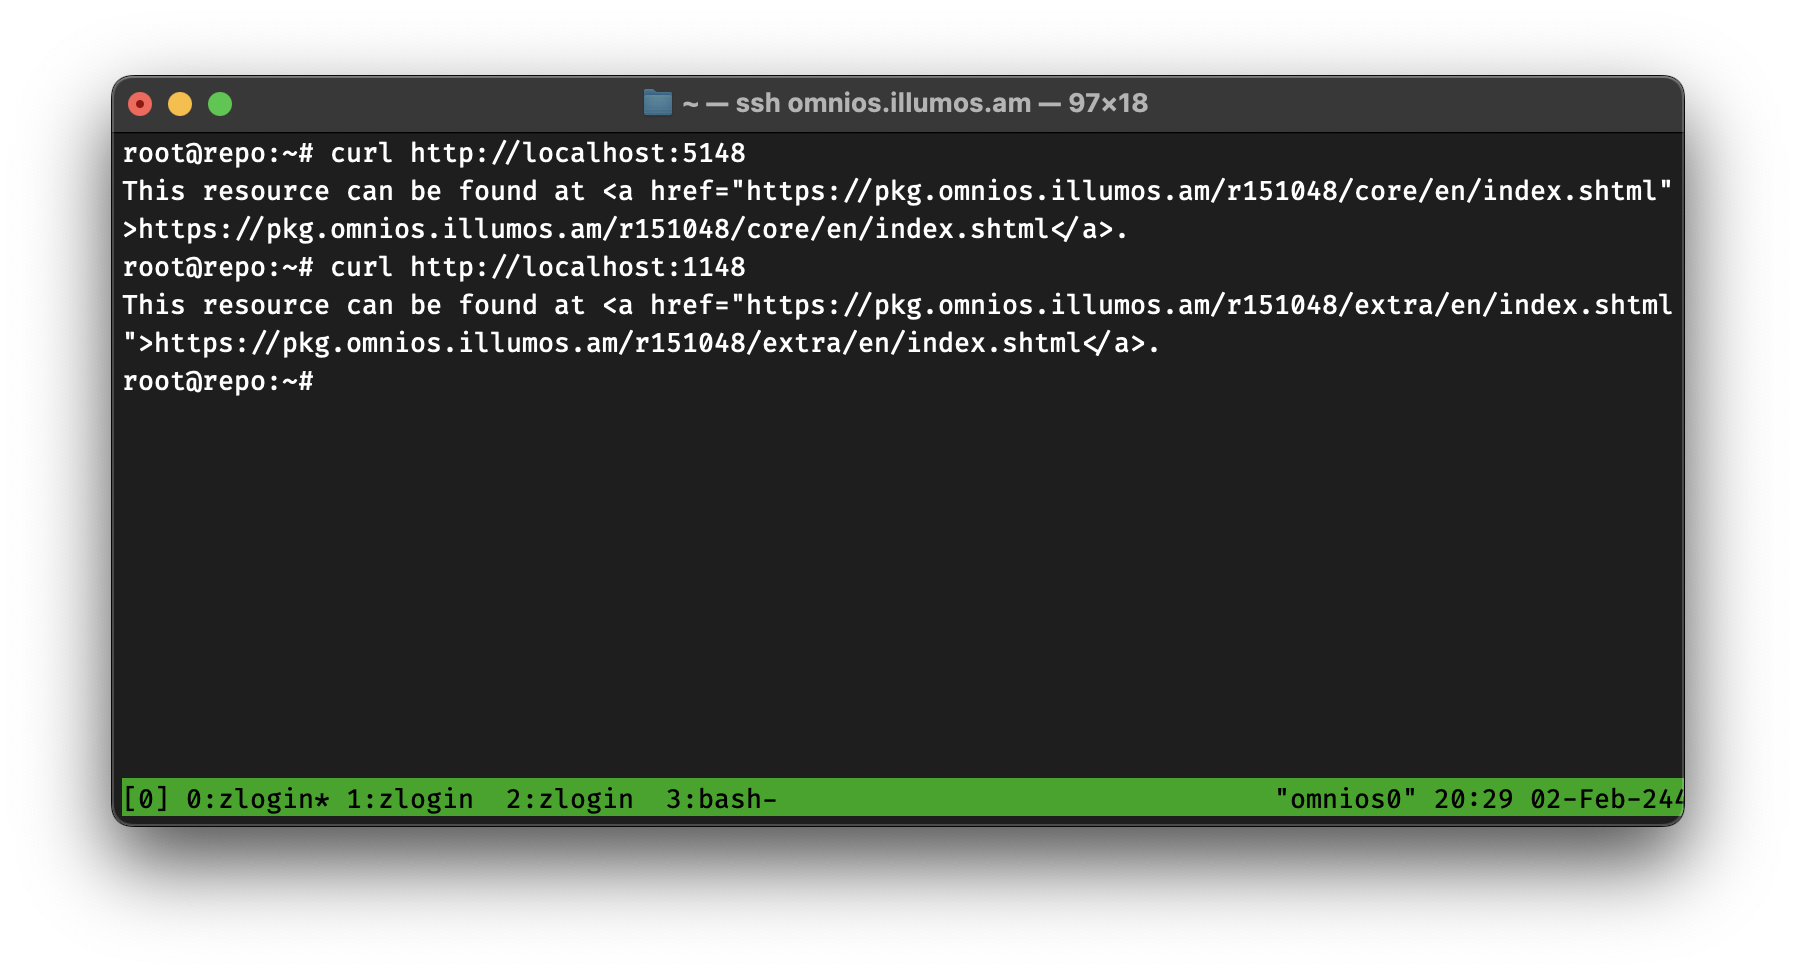
Let’s check!

We’re good! Now let’s setup Nginx 🙂

The Web Server

This part is pretty easy, we login into www0, install nginx, and setup some paths. I will be posting a copy-pasta of my configs, I assume you can do the rest 🙂

www0# pkgin update
www0# pkgin install nginx

Thank you SmartOS! 🧡

In my nginx.conf, I added

include vhosts/*.conf;

and then in /opt/local/etc/nginx/vhosts I created a file
named pkg.omnios.illumos.am.conf, which looks like this

server {
        listen 80;
        server_name pkg.omnios.illumos.am;

        location /.well-known/acme-challenge/ {
          alias /opt/local/www/acme/.well-known/acme-challenge/;
        }

        location / {
            return 301 "https://pkg.omnios.illumos.am";
        }
}

server {
    listen       443 ssl;
    server_name  pkg.omnios.illumos.am;

    ssl_certificate      /etc/ssl/pkg.omnios.illumos.am/fullchain.pem;
    ssl_certificate_key  /etc/ssl/pkg.omnios.illumos.am/key.pem;
    location /r151048/core/ {
                proxy_pass http://10.10.0.51:5148/;
    }

    location /r151048/extra/ {
                proxy_pass http://10.10.0.51:1148/;
    }

    location / {
# This needs to be changed, later... add_header Content-Type text/plain; return 200 "ok..."; } }

Finally, we just need to enable nginx

www0# svcadm enable pkgsrc/nginx

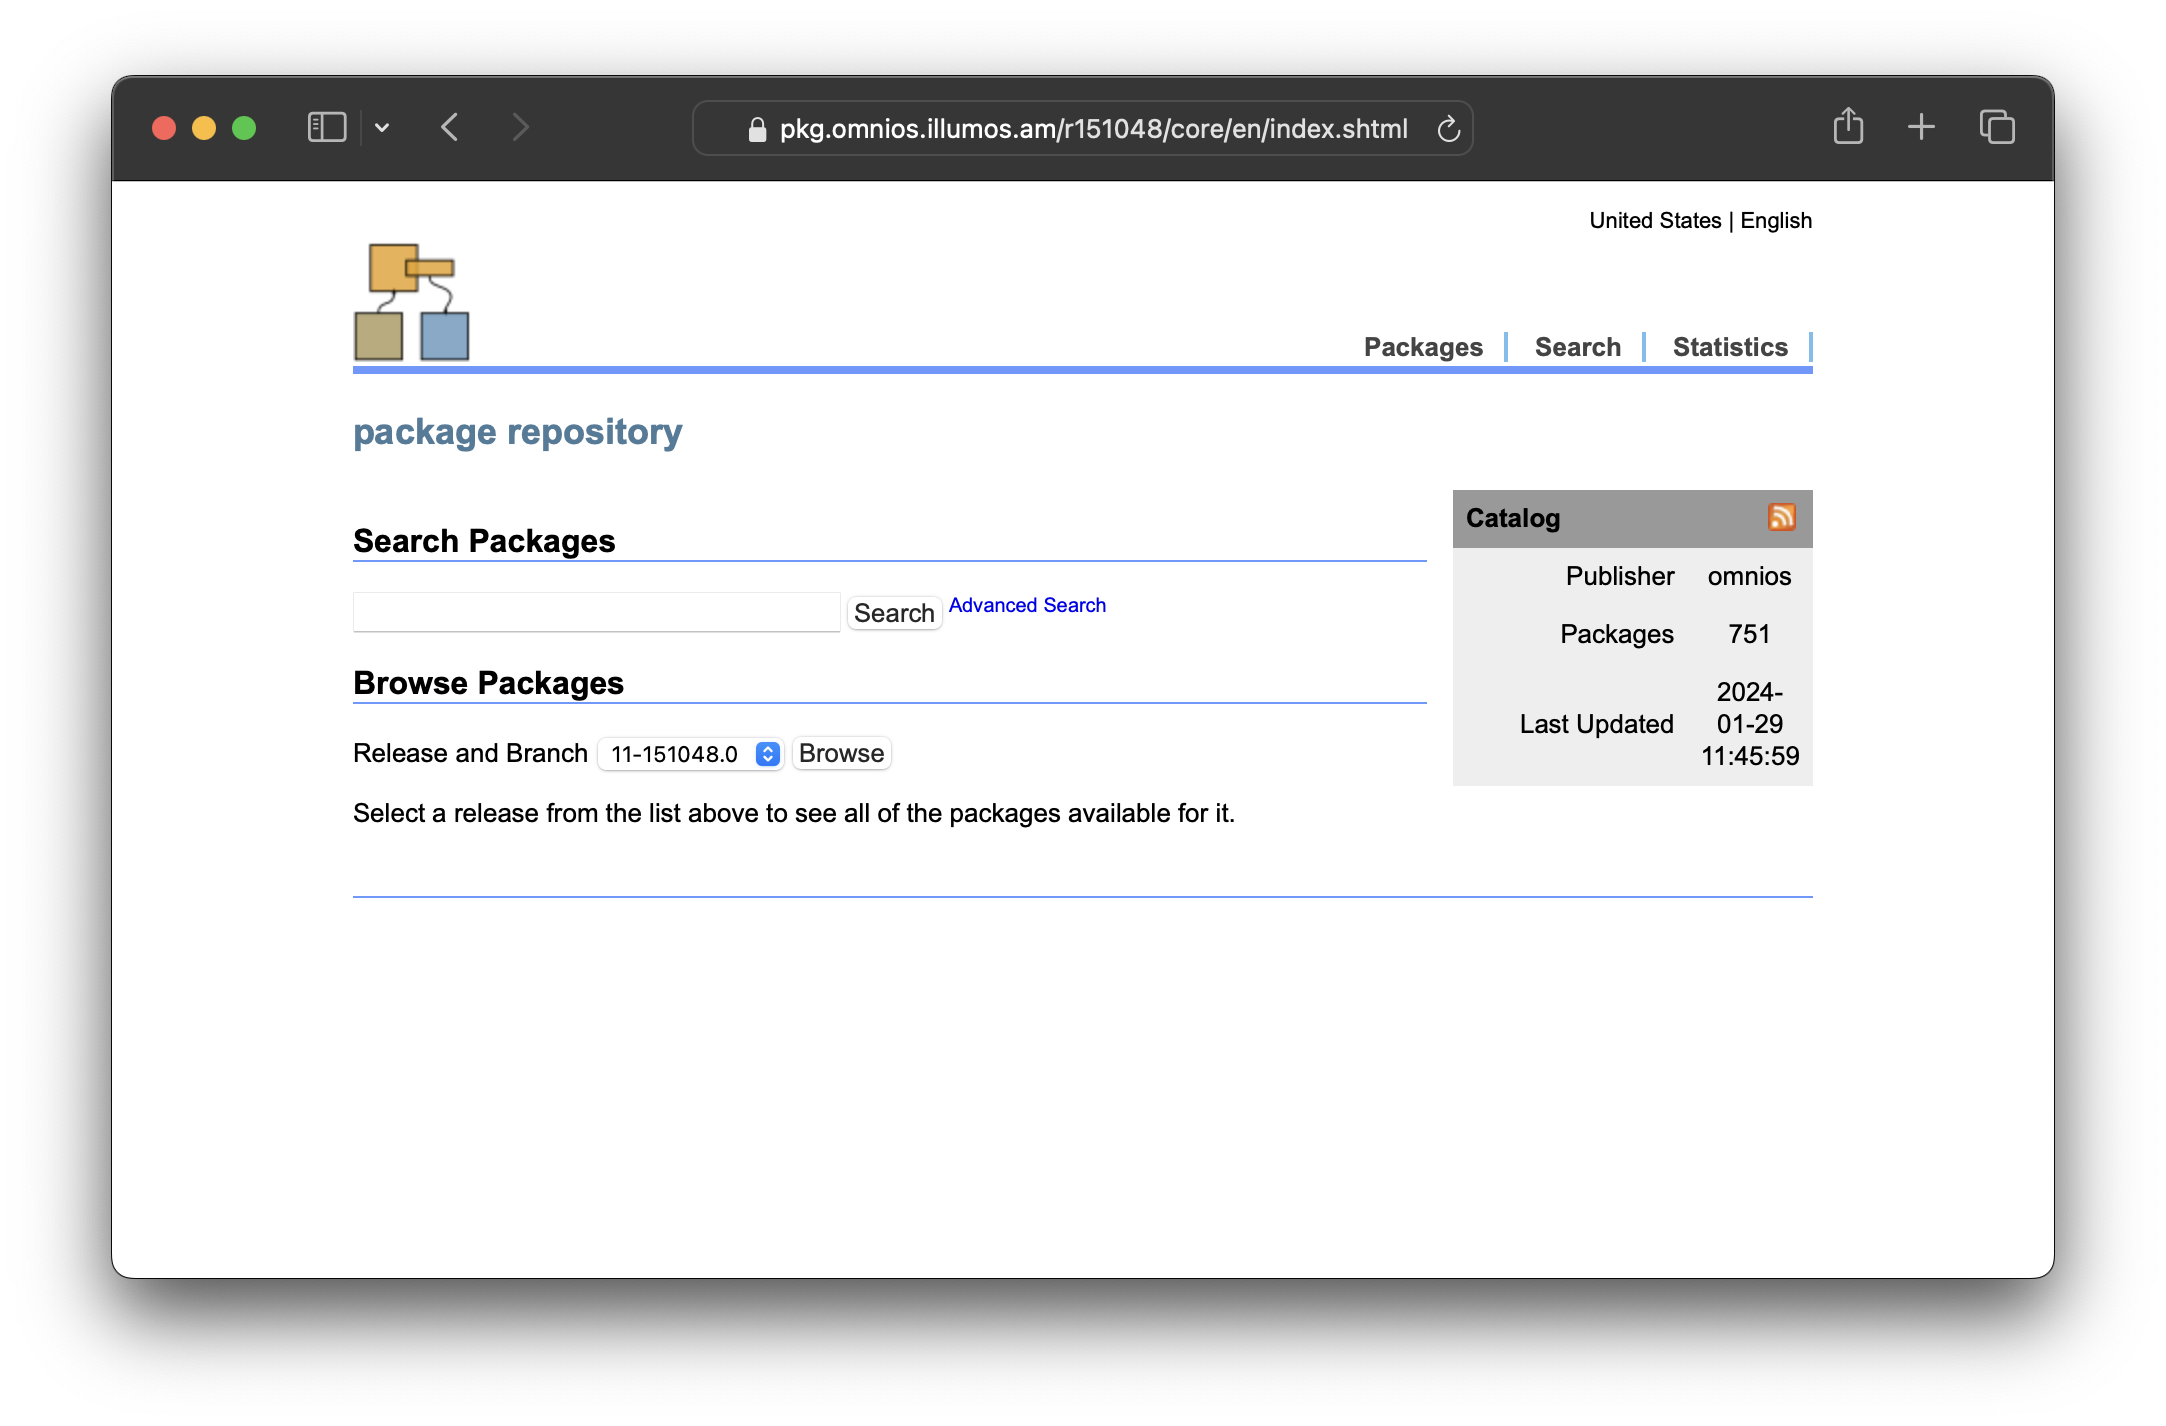
and check!

Using the Local Repos

This part is actually pretty easy. We just need to remove everything that exists and add our own. I will be running this on a computer named dna0.

dna0# pkg set-publisher -M '*' -G '*' omnios
dna0# pkg set-publisher -M '*' -G '*' extra.omnios
dna0# pkg set-publisher -O https://pkg.omnios.illumos.am/r151048/core omnios
dna0# pkg set-publisher -O https://pkg.omnios.illumos.am/r151048/extra extra.omnios
dna0# pkg publisher PUBLISHER TYPE STATUS P LOCATION extra.omnios origin online F https://pkg.omnios.illumos.am/r151048/extra/ omnios origin online F https://pkg.omnios.illumos.am/r151048/core/

We’re good! 🙂

Fetching Updates

By the time I wanted to publish this I noticed that there’s a new OmniOS Weekly Update, so I thought, hey, maybe I should try updating the Local Repo as well… how do we do that?

Turns out I just need to pkgrecv again, and then run a refresh command.

pkgrecv -v -s https://pkg.omnios.org/r151048/core/ -d /repo/r151048/core/ '*'
pkgrepo -s /repo/r151048/core refresh

And looks like we’re good! Maybe we can setup a simple cronjob 🙂

Final Notes

This has been an amazing experience. Since I started using OmniOS two weeks ago, I’ve setup the mirror, I installed two OmniOS deployments on production for two organization, and I talked about it during our Armenian Hackers Radio Podcast. With this mirror completely setup, I can advocate even more!

I’d like to send my thanks (and later, my money) to the OmniOS team for the amazing work they’re doing, special thanks to andyf for answering all of my questions, neirac for pushing me to try more illumos in my life and everyone who contributed to the docs and blog posts that I used. I’ll leave some links below.

Finally, for the coming (two) posts I will talk about mirroring downloads.OmniOS.org (for ISO/USB/ZFS images) and the pkgsrc repository run by SmartOS/MNX.

Thank you for reading and thank you, illumos-community for being so nice ^_^

That’s all folks…

Links

Reply via email.

Antranig Vartanian

February 8, 2023

Turns out when you start MariaDB for the first time it prints technical messages and theeen it says:

Please report any problems at https://mariadb.org/jira

The latest information about MariaDB is available at https://mariadb.org/.

Consider joining MariaDB's strong and vibrant community:
⠀https://mariadb.org/get-involved/

Starting mysql.

I love this!

I think we should add something similar to FreeBSD, where after the installation is done it says something like:

Please report any problems at https://bugs.freebsd.org/
The latest Handbook is available at https://freebsd.org/handbook/

Consider joining FreeBSD’s worldwide community:
https://docs.freebsd.org/en/articles/contributing/

Thank you for choosing FreeBSD!

Wait, maybe we have such a message? I have to check and then patch if we don’t 🙂

That’s all folks…

Reply via email.

The command command

According to the 2018 edition of The Open Group Base Specifications (Issue 7), there’s a command named command which executes commands.

Wait, macOS is OpenGroup UNIX 03 certified, right?

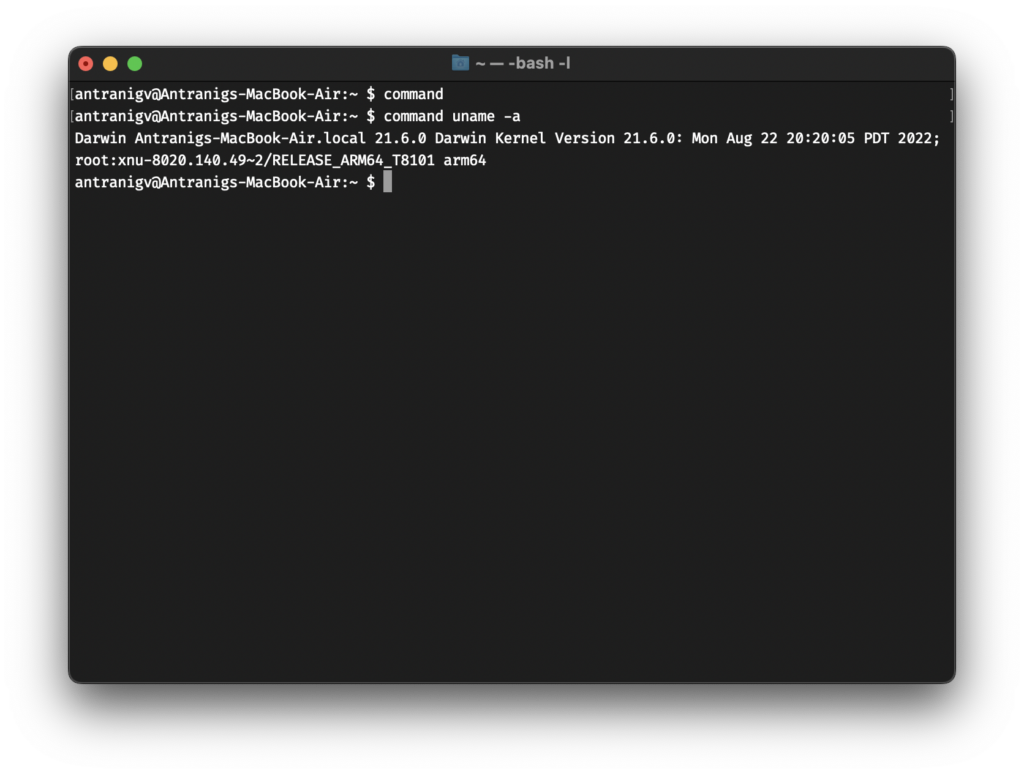
command running uname -a

I tried tracing back the history, macOS is mostly based on FreeBSD, as we can see in their open-source code.

So I started tracing back the FreeBSD code, and I found the current one.

I found the oldest commit about command in FreeBSD’s source tree, but it said

Import the 4.4BSD-Lite2 /bin/sh sources

builtins.def

So I opened up the SVN tree of CSRG, and there I found this

date and time created 91/03/07 20:24:04 by bostic

builtins.def

However, if I knew how to use SVNWeb, I’m pretty sure I’d navigate around the /old/sh directory.

It’s funny, how this line
# NOTE: bltincmd must come first!
Is both in the macOS code AND the CSRG code from 30 years ago.

That’s all folks…

Reply via email.

Linux is dead, long-live Docker monoculture

Full Discloser: While reading this blog post, please put yourself in my shoes. You’ve been looking around for a simple monitoring solution, you found some. None of the some are working because you use an Operating System that is used by Apple, WhatsApp, Netflix and many more, but developers think that everyone, everywhere, runs either macOS or Linux. And they all use Docker.

A while back Rubenerd wrote that he’s not sure that UNIX won and how Linux created a monoculture of assuming everything is supposed to run on Linux.

For me, this was not much of a problem, I can run Linux binaries on FreeBSD, I even watch Netflix using Linuxulator.

But now things are on another level, WAY another level.

I have a simple monitoring setup using cron, Grafana, InfluxDB and ping. It basically pings my servers and sends me a telegram message if they are down.

I set that up years ago, but now I have more public facing infrastructure that other people use as well, such as an Armenian Lobsters instance, Jabber.am, a WriteFreely instance and more.

As a self-respecting Ops, I wanted to make a simple dashboard for my users to see the uptime status of these services as well. First, they won’t bug me asking if something is not working; they will SEE, that, SSL/TLS certificate is expired, or the network is an issue, or that the server is down.

<rant>

So I started hunting on the internet for some software that do just that.

The first one that came to my mind was Gatus. I’ve used Gatus before for one of my clients, I like it a lot. It’s simple, it does what it’s supposed to do.

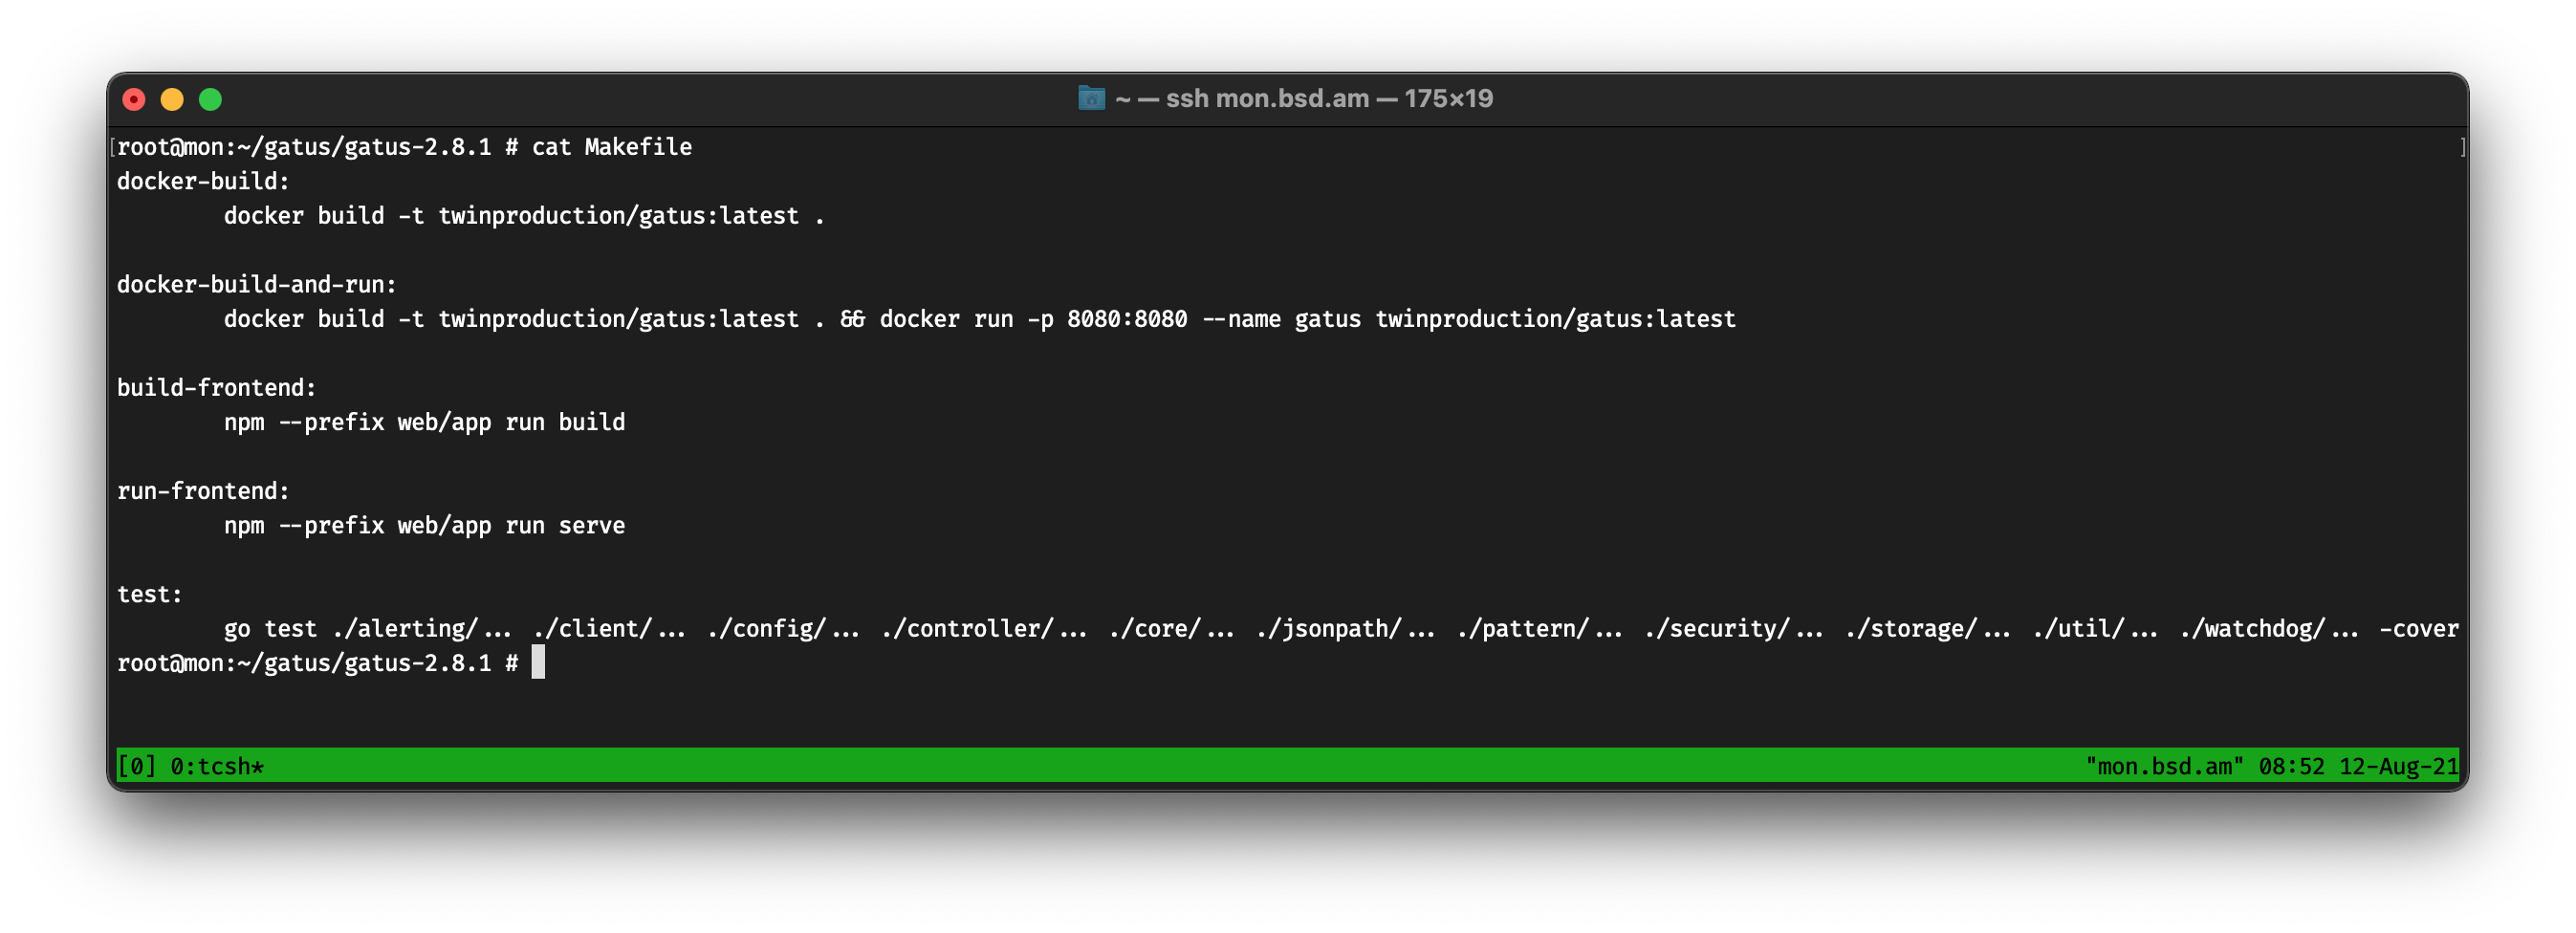
As a sane person, I fetched the code from GitHub using fetch, extracted the tarball and ran make. Nothing happens. Let’s see the Makefile, shall we?

Docker executed in Make

Oh boy, if only, only, I had Docker, all my problems would be solved. First of all, let’s talk about the fact that this Makefile is used as a… script. There’s no dependencies in the targets!

Okay, let’s read that Dockerfile. Executing the scripts inside it should help out, aye?

# Build the go application into a binary
FROM golang:alpine as builder
RUN apk --update add ca-certificates
WORKDIR /app
COPY . ./
RUN CGO_ENABLED=0 GOOS=linux go build -mod vendor -a -installsuffix cgo -o gatus .

# Run Tests inside docker image if you don't have a configured go environment
#RUN apk update && apk add --virtual build-dependencies build-base gcc
#RUN go test ./... -mod vendor

# Run the binary on an empty container
FROM scratch
COPY --from=builder /app/gatus .
COPY --from=builder /app/config.yaml ./config/config.yaml
COPY --from=builder /app/web/static ./web/static
COPY --from=builder /etc/ssl/certs/ca-certificates.crt /etc/ssl/certs/ca-certificates.crt
ENV PORT=8080
EXPOSE ${PORT}

There are multiple things wrong in me this.

First, please stop putting your binaries in /app, please, pretty-please? We have /usr/local/bin/ for that.

Second, I thought that running go build without GOOS=linux would solve all of my problems. I was wrong, very wrong.

root@mon:~/gatus/gatus-2.8.1 # env CGO_ENABLED=0 go build -mod vendor -a -installsuffix cgo -o gatus .
package github.com/TwinProduction/gatus
        imports github.com/TwinProduction/gatus/config
        imports github.com/TwinProduction/gatus/storage
        imports github.com/TwinProduction/gatus/storage/store
        imports github.com/TwinProduction/gatus/storage/store/sqlite
        imports modernc.org/sqlite
        imports modernc.org/libc
        imports modernc.org/libc/errno: build constraints exclude all Go files in /root/gatus/gatus-2.8.1/vendor/modernc.org/libc/errno

Okay, check this out, the package is called modernc.org/sqlite and it says:

Package sqlite is a CGo-free port of SQLite.

SQLite is an in-process implementation of a self-contained, serverless, zero-configuration, transactional SQL database engine.

Of course it is. Looks like I have to port all of this to FreeBSD. Which, don’t get me wrong, I’m okay with doing that, but I thought that we have POSIX for a reason. notsomuch.

Okay, I’m an open-source guy, I’ll spend some time this weekend to port this to FreeBSD. Let’s look for another solution!

Here’s another one, it’s called statping, also written in Go, the readme is so promising.

No Requirements

Statping is built in Go Language so all you need is the precompile binary based on your operating system. You won’t need to install anything extra once you have the Statping binary installed. You can even run Statping on a Raspberry Pi.

Sounds good! Let’s try it out.

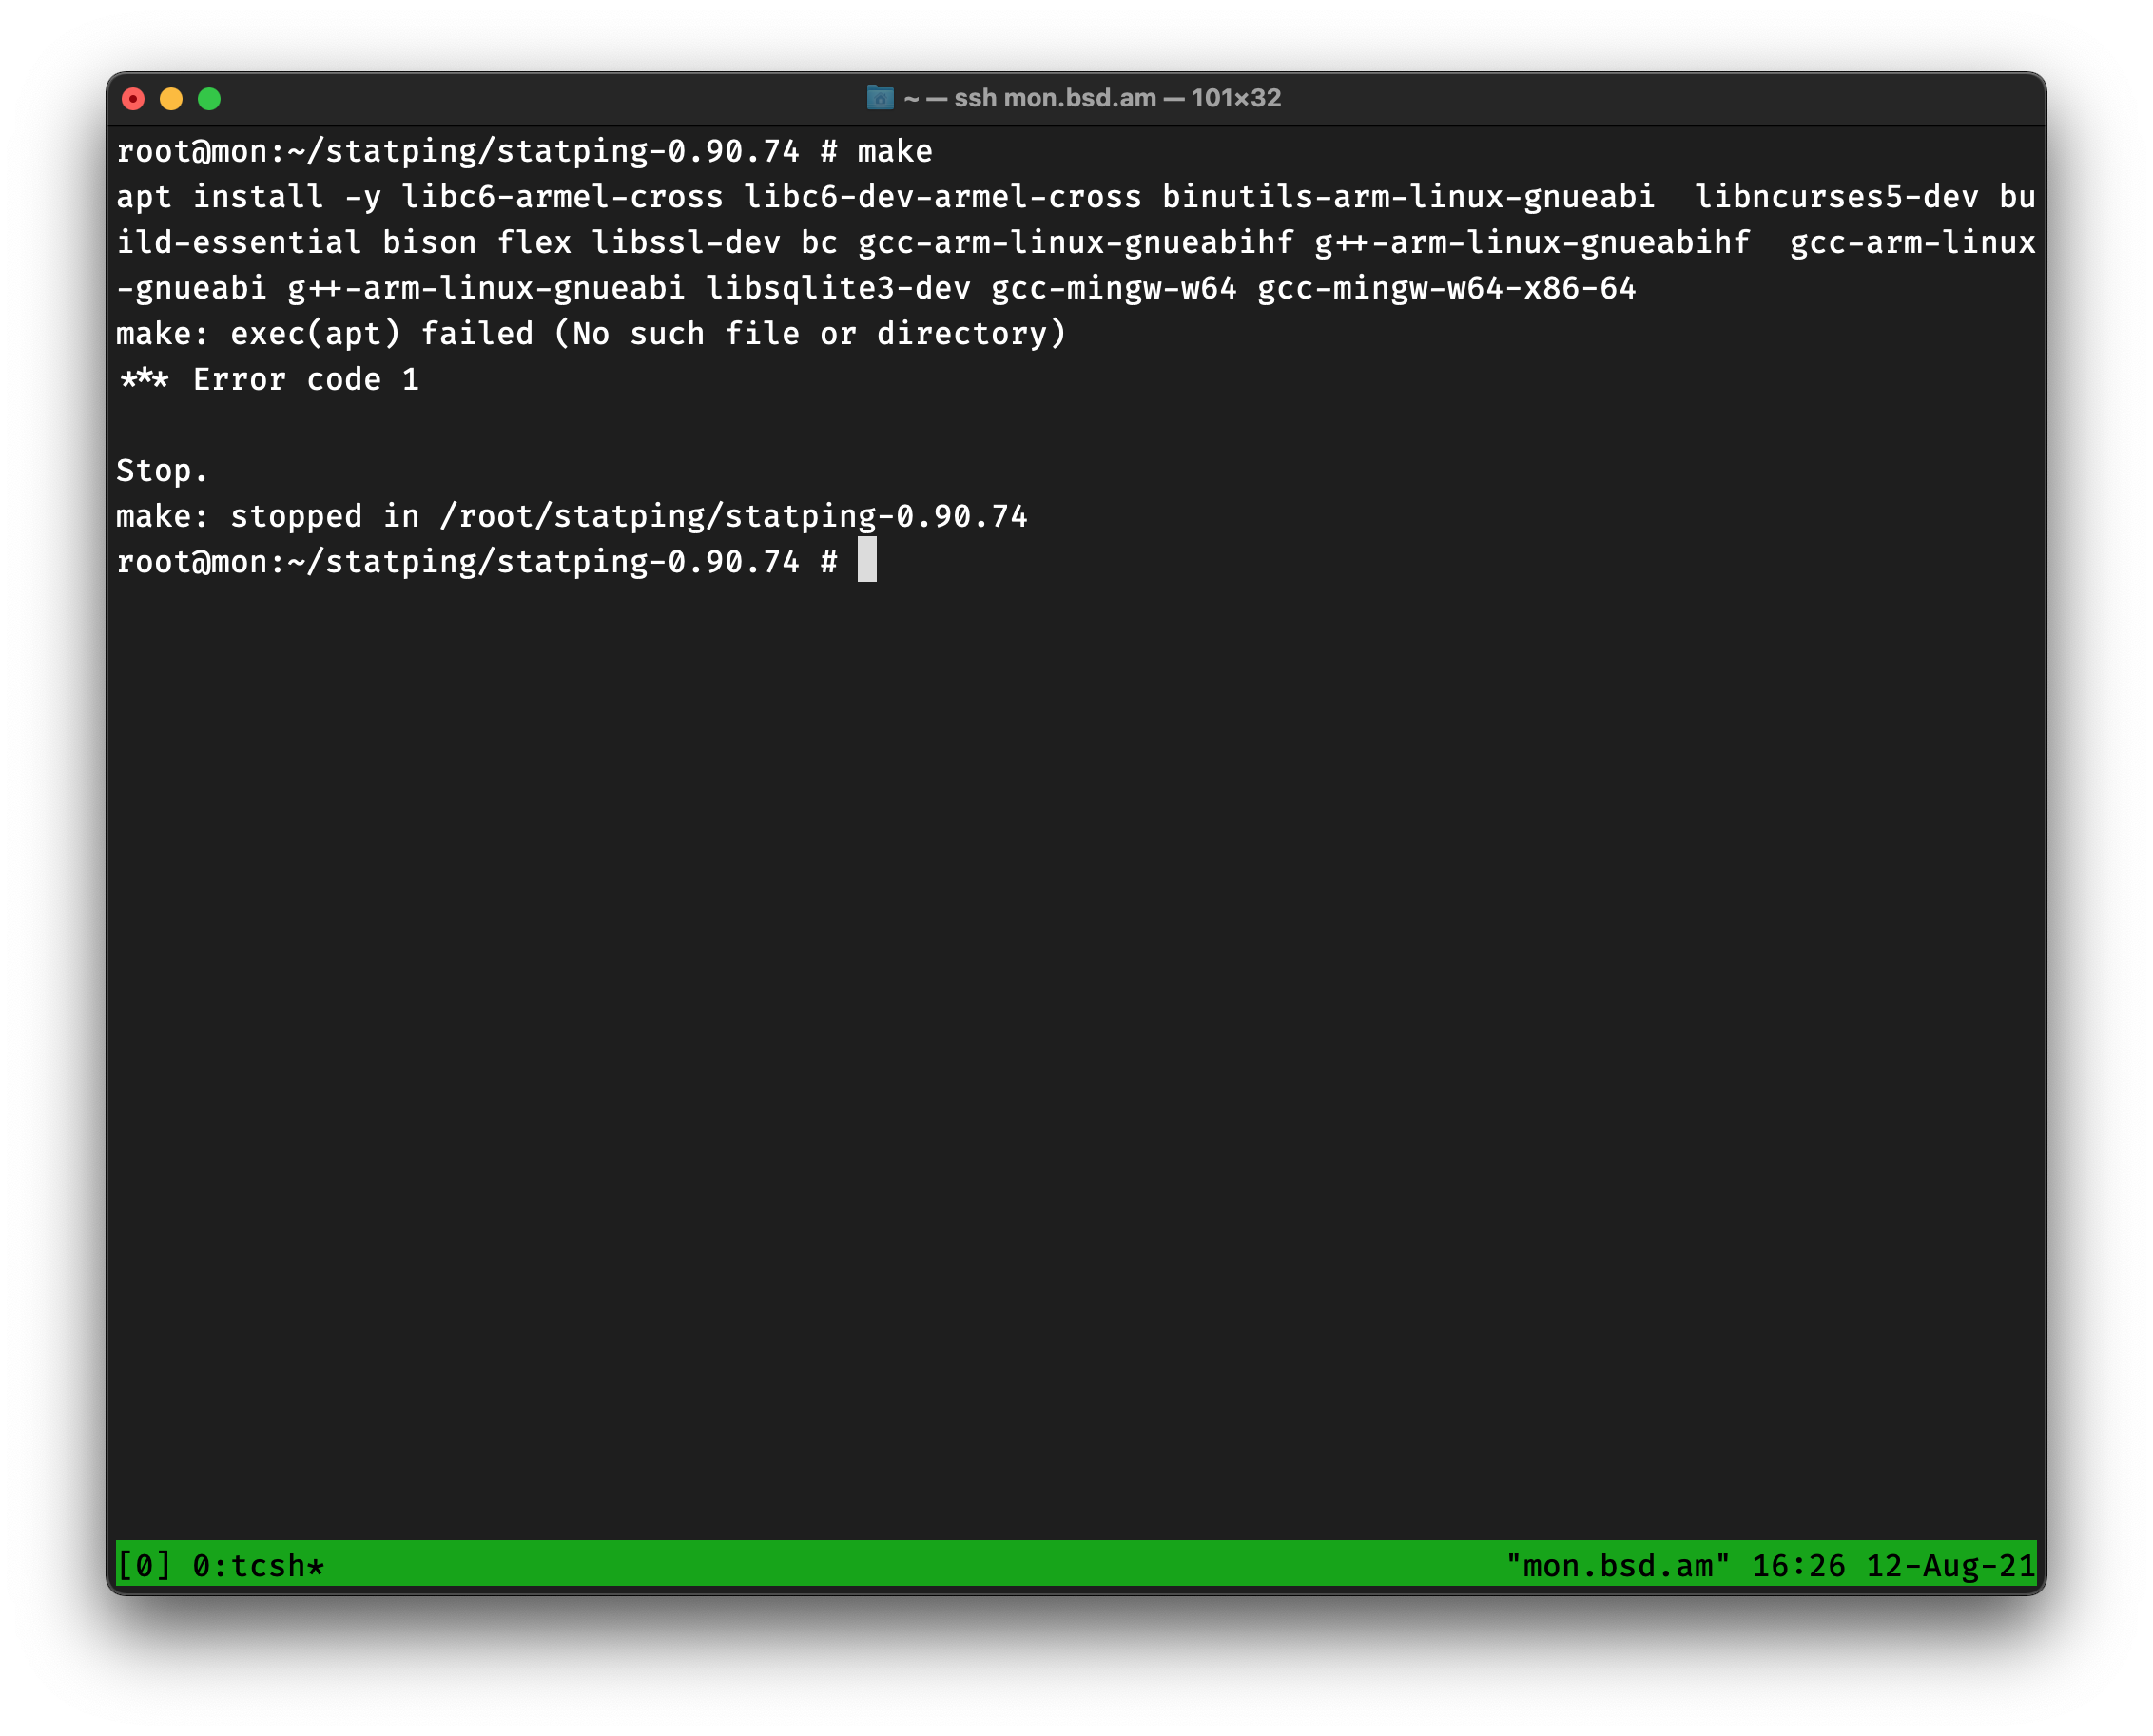
Again, I fetch the tarball, I extract and I bake make.

apt executed in Make

Of course it requires apt! Because not only we all run Linux, be we all run a specific distribution of Linux with a specific package manager.

While tweeting with anger, Daniel pointed out that I should tell them kindly and it’ll work out. I’m sure it will. Let’s hope I can make it work first. I don’t like just opening issues. I’d rather send a patch directly.

</rant>

Overall, now I understand why most *BSD folks use, what’s the word here? ah, yes, old-school software on their systems, like Nagios and the rest.

The developers of the New World Order will assume, always, you are running Linux, as Ubuntu, and you always have Docker.

Hopefully this weekend I will be able to port these software to FreeBSD, otherwise I will just use the Linux layer.

Like Rubenerd said, I am thankful that the mainstream-ness of Linux helped other Unix systems as well, but monocultures are destroying what people have spent years to improve.

Hopefully, next week, I will write a blog post on how to fix these issues and how I got all of those up and running.

That’s all folks…

Reply via email.

Two Colons Equals Modules

Days ago I tweeted a shell function which is part of jailio’s code base. Jailio is a project I’ve been working on for the last 6 months. As the name implies, it’s a container management software for FreeBSD Jails.

It has two unique things compared to other Jail management software. First of all, it has no dependencies, it’s written purely in Shell. You can say the same about BastilleBSD, however, Jailio’s second unique thing is that it uses base tools only and requires the base system only. For example, you need to have bastille_enable in BastilleBSD, it also uses its own config files, etc. In Jailio, you need to have jail_enable, because technically Jailio automates jail.conf files. It also uses my patch to automate the jail.confs in /etc/jail.conf.d.

Anyway, back to our topic about Colons and Modules.

I like modules, I got introduced to them when I started programming in school. In Syria, we learn programming at 7th grade but in our school we started a year early, so 6th grade. We always start with block diagrams and then Turbo Pascal!

Yes, 16-bit Turbo Pascal was my first programming language and it had the concept of modules which we called Units.

And then you have languages like C or Shell which don’t have modules. If you use modules you KNOW that it’s hard not to use modules after that.

While reading the source code of vm-bhyve I learned that you can use two colons (::) as part of the function name, which can give you an amazing new superpower to take over the world write cleaner code.

For me this was a life-changer. I write a LOT of Shell code. I ship them to production too. No, you don’t need to write everything in a fancy new language and run it on kubernetes, you can always use simple languages like Shell and run them in a FreeBSD Jail. Or in my case, write in Shell to automate FreeBSD Jails.

Here’s an example code with “modules” in Shell. Note, this works in FreeBSD’s shell, I have not tested other Shells yet.

main.sh

#!/bin/sh

. ./mod1.sh

mod1::func1

mod1.sh

#!/bin/sh

mod1::func1(){
  printf "Here I am, rock you like a hurricane\n"
}
antranigv@pingvinashen:~ % ./main.sh 
Here I am, Rock you like a hurricane

As you can see it all relies on the concept that the function name itself has two colons in its name.

Here’s the code from jailio that I tweeted.

jail::get_next_id(){
  expr $(
    ( grep -s '$id' /etc/jail.conf.d/* || echo '$id = "0";' ) |
    awk -F '[="]' '{print $3}' |
    sort -h |
    tail -1
  ) + 1
}

After tweeting the code above Annatar replied that this should NOT work elsewhere and that’s how I got introduced to The Heirloom Project which provides traditional implementations of the original Unix tools from the original Unix source code.

Hopefully, I will see more people using “modules” in Shell scripts. Hopefully this trick works in other Shell implementations like Bash and zsh.

That’s all folks.

Reply via email.